
Setting masked phone numbers with MessageBird
⏱ 45 min build time || Download the Code
Why build a number masking application?
In this MessageBird Developer Tutorial, you’ll learn how to anonymize and protect your users’ personal information by building a basic masked numbers application powered by the MessageBird API.
Online service platforms—such as ride-sharing, online food delivery, and logistics—facilitate the experience between customers and providers by matching both sides of the transaction to ensure everything runs smoothly and the transaction is completed.
Sometimes it’s necessary for customers and providers to talk or message each other directly; a problem arises since, for many reasons, both parties may not feel comfortable sharing their personal phone number. A great solution to this issue is using anonymous proxy phone numbers that mask a user's personal phone number while also protect the platform's personal contact details. The result: a customer doesn't see their provider's phone number but a number that belongs to the platform and forwards their call to the provider, and vice versa for providers.
Along this tutorial, we'll show you how to build a proxy system to mask phone numbers in Go for our fictitious ride-sharing platform, BirdCar. The sample application includes a data model for customers, drivers, rides, and proxy phone numbers and allows setting up new rides from an admin interface for demonstration purposes.
Getting started
First things first, our sample application is build in Go, so you need to install Go and the MessageBird Go SDK.
Now, let’s install the MessageBird Go SDK with the go get command:
go get -u -v github.com/messagebird/go-rest-api
To keep the tutorial straightforward, we'll be using the Go standard library for most of our application and a SQLite3 database to store the data model that powers our ridesharing application. You may want to use a different RDBMS for a production-ready implementation; the SQL statements used in this tutorial should be transferable to any RDBMS that uses SQL.
To work with and connect to a SQLite3 database, we'll need to install mattn\'s SQLite3 driver for Go, go-sqlite3:
go get -u -v github.com/mattn/go-sqlite3
You need to have gcc installed in order to build your application with go-sqlite3. Check out go-sqlite3 documentation for more information about it.
Ready? Let’s move on to structuring our application.
Structuring our application
Our BirdCar ridesharing service seeks to pair customers who need a car ride with drivers looking for passengers. When a customer contacts BirdCar to request for a ride, our application should:
- Ask the customer for details of the ride they need.
- Pair the customer up with a driver.
- Check our database for a VMN that we can assign to the ride as a proxy number.
- Once we find an available VMN to use as a proxy number, we send an SMS notification to both the customer and driver from that proxy number to let them know that they can use this number to contact the other party for this ride.
- We then write the ride's details to our database.
- When one party calls or sends an SMS message to a proxy number, our application relays that call or SMS message to the other party for that ride.
To get our application to do all of the above, we need to build the following:
- Data model: To store ride information.
- A MessageBird flow that forwards SMS received by our VMNs to a webhook URL.
- A MessageBird flow that forwards calls received by our VMNs to another webhook URL.
Web Application: Our web application should:
- Read from and write to our database.
- Publish an administrator's interface to manage BirdCar rides.
- Handle POST and GET requests from MessageBird flows.
- When a ride is added, send an SMS notification to the customer and driver for that ride.
- When a customer or driver sends an SMS message to a VMN, our application should detect a POST request at a given URL and relay the message to its intended recipient.
- When a customer or driver calls a VMN, our application should detect a GET request at a girl URL and relay the call to its intended recipient.
With this in mind, we can start building your application. We'll write our Go code in four separate files to make it easier to read and understand:
- main.go contains our application's main() block.
- db.go contains the code that interacts with our SQLite3 database.
- routes.go contains code that defines our HTTP routes.
- routeHelpers.go contains code that defines helper functions we'll use when writing our HTTP routes.
These files should be located at your project root. To start your application, run the following command in the terminal:
go run *.go
First, we'll initialize and configure the MessageBird Go SDK in main.go.
Configuring the MessageBird Go SDK
We'll need to configure the MessageBird Go SDK with a valid API key in order to make calls and send SMS messages with the MessageBird REST API.
First, create a file named .env in your project directory. Then, get your MessageBird API key from the API access (REST) tab in the Developers section of the MessageBird Dashboard, and write it into your .env file like so:
MESSAGEBIRD_API_KEY=<enter-your-api-key-here>
If you are having any issues creating your API key, please reach out to support@messagebird.com; we’ll make sure to help you out.
Run the following commands in your terminal to load your API key as the MESSAGEBIRD_API_KEY environment variable:
source .envexport MESSAGEBIRD_API_KEY
Once that's done, add the following code to main.go to initialize the MessageBird Go SDK:
// main.gopackage mainimport ("log"messagebird "github.com/messagebird/go-rest-api")func main(){mb := messagebird.New(os.Getenv("MESSAGEBIRD_API_KEY"))}
You can also use a library like GoDotEnv to automatically load environment variables from a configuration file.
Building our data model
Because Go is strict about handling data types, we'll be building our data model first to help us understand how to build the rest of our application around our data.
Judging from our application structure, we know that our database should contain the following tables:
- Customer data
- Driver data
- Proxy number pool
- Ride information
In the following sections, we'll write the SQL statements to initialize our ridesharing database and then figure out how to read data from it into data structures that we set up in our application.
Initialize ridesharing database
First, let's initialize our ridesharing database. Add the following code to our db.go file:
// db.gopackage mainimport ("database/sql""log"_ "github.com/mattn/go-sqlite3")func must(err error) {if err != nil {log.Fatal(err)}}func dbInsert(queries []string) {db, err := sql.Open("sqlite3", "./ridesharing.db")must(err)for _, i := range queries {statement, err := db.Prepare(i)must(err)_, err = statement.Exec()must(err)}defer db.Close()}// initExampleDB inserts example data into the sqlite dbfunc initExampleDB() {createTables := []string{"CREATE TABLE IF NOT EXISTS customers(id INTEGER PRIMARY KEY, name TEXT, number TEXT UNIQUE)","CREATE TABLE IF NOT EXISTS drivers (id INTEGER PRIMARY KEY, name TEXT, number TEXT UNIQUE)","CREATE TABLE IF NOT EXISTS proxy_numbers (id INTEGER PRIMARY KEY, number TEXT UNIQUE)","CREATE TABLE IF NOT EXISTS " +"rides (id INTEGER PRIMARY KEY, " +"start TEXT, destination TEXT, datetime TEXT, customer_id INTEGER, driver_id INTEGER, number_id INTEGER, " +"FOREIGN KEY (customer_id) REFERENCES customers(id), FOREIGN KEY (driver_id) REFERENCES drivers(id))",}dbInsert(createTables)}
Awesome! In the code snippet above, we've:
- Defined two helper functions: must(), which logs any errors encounters and exits the program, and dbInsert(), which prepares and executes a list of SQL statements passed into it.
- We then write a series of SQL statements to execute, and pass that into a dbInsert() call.
- In our SQL statements, we've: Created four tables: customers, drivers, proxy_numbers, and rides Made sure that each SQL CREATE TABLE statement is idempotent by writing IF NOT EXISTS, so we don't attempt to insert tables that already exist into our database. This means that initExampleDB() can be safely run multiple times, even if we've already initialized the database.
- We've set phone numbers (numbers) as UNIQUE to make sure that we don't get duplicate phone numbers. This is important because we’ll be using phone numbers to identify who to relay SMS messages and phone calls to.
Next, we'll add example data into our database. When writing your production-ready application, remember to replace these with actual data. Add the following lines of code to the bottom of your initExampleDB() block:
// db.gofunc initExampleDB(){// ...insertData := []string{"INSERT INTO customers (name, number) VALUES ('Caitlyn Carless', '319700000') ON CONFLICT (number) DO UPDATE SET name=excluded.name","INSERT INTO customers (name, number) VALUES ('Danny Bikes', '319700001') ON CONFLICT (number) DO UPDATE SET name=excluded.name","INSERT INTO drivers (name, number) VALUES ('David Driver', '319700002') ON CONFLICT (number) DO UPDATE SET name=excluded.name","INSERT INTO drivers (name, number) VALUES ('Eileen LaRue', '319700003') ON CONFLICT (number) DO UPDATE SET name=excluded.name","INSERT INTO proxy_numbers (number) VALUES ('319700004') ON CONFLICT (number) DO NOTHING","INSERT INTO proxy_numbers (number) VALUES ('319700005') ON CONFLICT (number) DO NOTHING",}dbInsert(insertData)}
We've added ON CONFLICT (number) ... to each SQL statement because, unlike names, we need phone numbers in our database to be unique (we already covered that above). You may want to replace the phone numbers in the examples with working phone numbers to allow you to test your application. But for now, we're just concerned with getting the shape of our data right, so we can begin writing code to read data from our database into our ridesharing application.
Set up data structures
Now that we've written the code to initialize our database, we can start writing code to read data out from it into our application. The sql package from the Go standard library allows us to run SQL queries on a database by calling db.Query("SELECT * FROM your_table"), which then gives you a Rows struct that you have to unpack.
In this section, we'll learn:
- How to read from a Database with Go
- Defining the structs that contain data
- Load data into data structures
How to read from a database with Go
Because Go is a strictly typed language, the code to read data from databases is slightly more verbose. For example, if we run a SELECT query to read from our customers table, we have to unpack the Rows struct we receive by writing the following code:
// Example// These variables can have any name, but must be the same type as the data we're going to copy into it.var (customerID intcustomerName string // 'text' type in the databasecustomerNumber string // 'text' type in the database)rows, _ := db.Query("SELECT * FROM customers")for rows.Next() {rows.Scan(&customerID,&customerName,&customerNumber)log.Printf("ID: %d\nName: %s\nPhone Number: %s\n", customerID, customerName, customerNumber)}
The code snippet above does the following:
- It runs a database query (we're discarding the error to keep our example brief) and saves the *sql.Rows struct that's returned to the rows variable.
- It then iterates through the records stored in rows with a for rows.Next() loop. When rows.Next() returns false, it means we've run out of records to process and can exit the loop.
- For each record we find in rows, we call rows.Scan() to scan the columns of that record.
- For each column that the record contains, we pass in the address of the variable we want to copy—the value contained in that column for that record. For example, for a record that has the columns "id" and "animal", we copy the values contained in these columns to variables we've already defined by calling rows.Scan(&idVariable, &animalVariable).
- The variables whose addresses we pass into our rows.Scan() call must fulfill the following: Each of the variables whose address we pass into the rows.Scan() call must be of the correct type for that corresponding column. For example, if we're trying to copy out a text value from the record, we must pass in a variable of type string. rows.Scan() must have exactly the same number of addresses passed into it as the number of columns in the record. If rows.Scan() contains a different number of addresses than the number of columns the record contains (more or fewer than expected), it returns an error and no values are copied out — causing your program to seem to have read an empty record. For example, for a record with the columns "id" and "animal", attempting to call rows.Scan(&firstVar, &secondVar, &thirdVar) won’t copy any values to firstVar, secondVar, or thirdVar — instead, it returns the error: sql: expected 2 destination arguments in Scan, not 3.
Defining the structure that contain data
We need to read from the four tables we've created in our database—customers, drivers, proxy_numbers, rides—and store them in some kind of data structure within our Go application. But before attempting to read data out from the database into our application, we have to define the shape of the data we expect to get from the database.
In your production application, you may want to implement a form of paging where you wouldn't read and copy all the data from your database into your application at one go. But to keep this tutorial straightforward, we'll have our application load the entire database into one struct that we pass to our application when rendering views.
We'll do this by describing the shape of the structs we'll be using to store data from these tables as struct types. At the bottom of your db.go file, add the following lines of code:
// db.go// Person is a person, to whom we assign a ID, Name, and Number.// Used to represent Customers and Driverstype Person struct {ID intName stringNumber string}// ProxyNumberType templates proxy numberstype ProxyNumberType struct {ID intNumber string}// RideType templates ridestype RideType struct {ID intStart stringDestination stringDateTime stringThisCustomer Person // foreign keyThisDriver Person // foreign keyThisProxyNumber ProxyNumberType // foreign keyNumGrp [][]int // Number groups for proxy number rotation}// RideSharingDB outlines overall rideshare data structuretype RideSharingDB struct {Customers map[int]PersonDrivers map[int]PersonProxyNumbers map[int]ProxyNumberTypeRides map[int]RideTypeMessage string // For misc messages to be displayed in rendered page}
In the above code example:
- We are defining several struct types to contain data we expect to get from the database.
- type Person struct describes a "person" as stored in our customers and drivers table.
- type ProxyNumberType describes a "Proxy Number" or a "VMN" as stored in our proxy_number table.
- type RideType struct describes a single "Ride" as stored in our rides table. Notice that we're "inheriting" types in our RideType struct for the ThisCustomer, ThisDriver, and ThisProxyNumber fields. This allows us to nest data for each ride, instead of relying on JOIN statements to get information about the foreign keys that these columns refer to in the rides table. We can do this because we don't intend to write persistent changes to RideType — all persistent changes to our data is written directly to our database. We also have an additional field named NumGrp. This field is used for our proxy number rotation implementation that we’ll write later.
- type RideSharingDB struct describes a struct that is an aggregate of all the data that we need to pass to our rendered views. In it, notice that we've shadowed our tables with map types. We'll get into how this works when we write the code for populating these data structures with data from the database. We also define a Message type in this struct, which we’ll use to pass error messages or similar to be displayed in our rendered views.
Load data into data structures
Once we've defined our data structures, we need to write a helper method that loads data into any RideSharingDB struct that we define and return it for the rest of our application to use.
Keep in mind that for brevity, we're not including the full code snippet. For the complete example application, go to the MessageBird Developer Tutorials GitHub repository.
Add to the bottom of your db.go file the following lines of code:
// db.gofunc (dbdata *RideSharingDB) loadDB() error {db, err := sql.Open("sqlite3", "./ridesharing.db")if err != nil {return err}defer db.Close()hereCustomers := make(map[int]Person)hereDrivers := make(map[int]Person)hereProxyNumbers := make(map[int]ProxyNumberType)hereRides := make(map[int]RideType)q := "SELECT * FROM customers"rows, err := db.Query(q)if err != nil {return err}for rows.Next() {var thisPerson Personerr := rows.Scan(&thisPerson.ID, &thisPerson.Name, &thisPerson.Number)if err != nil {log.Println(err)}hereCustomers[thisPerson.ID] = thisPerson}// ...// We're only including part of the code necessary for your application// to work. For the full code example, go to:// https://github.com/messagebirdguides// ...q4 := "SELECT * FROM rides"rows4, err := db.Query(q4)if err != nil {return err}for rows4.Next() {var thisRide RideTypeerr := rows4.Scan(&thisRide.ID, &thisRide.Start, &thisRide.Destination, &thisRide.DateTime, &thisRide.ThisCustomer.ID, &thisRide.ThisDriver.ID, &thisRide.ThisProxyNumber.ID)if err != nil {log.Println(err)}for k1, v1 := range hereCustomers {if k1 == thisRide.ThisCustomer.ID {thisRide.ThisCustomer.Name = v1.NamethisRide.ThisCustomer.Number = v1.Number}}for k2, v2 := range hereDrivers {if k2 == thisRide.ThisDriver.ID {thisRide.ThisDriver.Name = v2.NamethisRide.ThisDriver.Number = v2.Number}}for k3, v3 := range hereProxyNumbers {if k3 == thisRide.ThisProxyNumber.ID {thisRide.ThisProxyNumber.Number = v3.Number}}thisRide.NumGrp = append(thisRide.NumGrp, []int{thisRide.ThisCustomer.ID, thisRide.ThisProxyNumber.ID})thisRide.NumGrp = append(thisRide.NumGrp, []int{thisRide.ThisDriver.ID, thisRide.ThisProxyNumber.ID})hereRides[thisRide.ID] = thisRide}*dbdata = RideSharingDB{hereCustomers, hereDrivers, hereProxyNumbers, hereRides, ""}return nil}
In the code sample above:
- We're writing a method, with our RideSharingDB struct type as the method receiver. This allows us to load data into any RideSharingDB struct with this method.
- We're loading the ridesharing database into the variable db.
- Then we initialize the maps that will contain data that we read from our tables by using make().
- Once we've done that, we write our queries.
- For each query, we define a query statement q which we pass into db.Query() and get a rows struct.
- For each rows struct we get, we write a for rows.Next() loop that loops through each record in the table we've read.
- For each record we read, we define a container variable (thisPerson) that we copy values from the record into, and then append that variable to the corresponding map we've initialized in step 3, using the ID of that record as the map key.
- Once we've done this for all four tables, we rewrite the RideSharingDB
struct that is attached to this method with the data we've read off the
database with the following line of code:
- *dbdata = RideSharingDB{hereCustomers, hereDrivers, hereProxyNumbers, hereRides, ""}
When this helper method is called, it loads data from the database into the struct it’s attached to.
For example, if we define a struct with thisDatabase := new(RideSharingDB), and then call thisDatabase.loadDB(), it reads data from the database and loads it into the corresponding fields—thisDatabase.Customers, thisDatabase.Drivers, thisDatabase.ProxyNumbers, thisDatabase.Rides—to populate it.
We then can pass thisDatabase into any template to display the data in a rendered view.
MessageBird flows
Now that we've got all our data structures set-up, we can move on to configuring our MessageBird Dashboard to receive calls and SMS messages, and then forwarding them to their intended recipients.
To do this, we're going to:
- Expose our local development server with localtunnel.me
- Prepare one or more VMNs
- For each VMN you will be using in your number pool, you have to: Connect the VMN to a Webhook for SMS Connect the VMN to a Webhook for Voice
Expose local development server
We need to expose our development environment to the MessageBird servers for the MessageBird flows to work. You can use tools such as localtunnel.me or ngrok that provides a public URL to connect to a locally running server.
You can install localtunnel.me with npm:
npm install -g localtunnel
To expose a server running on port 8080, run:
lt --port 8080
The terminal then displays the URL at which you can access your application:
your url is: https://<assigned_subdomain>.localtunnel.me
Whenever you run the lt command, localtunnel.me starts a new lt instance that has a different unique URL assigned. Because you have to assign a static URL for MessageBird to make webhook requests, quitting and running lt again will change the URL for your local development server, causing MessageBird to be unable to contact it until you update your flows with your new URL.
Getting an inbound number
A requirement for receiving messages is a dedicated inbound number. Virtual mobile numbers (VNM) look and work similar to regular mobile numbers; however, instead of being attached to a mobile device via a SIM card, they live in the cloud and can process inbound SMS and voice calls. MessageBird offers numbers from different countries for a low monthly fee; feel free to explore our low-cost programmable and configurable numbers.
Purchasing a number is quite easy:
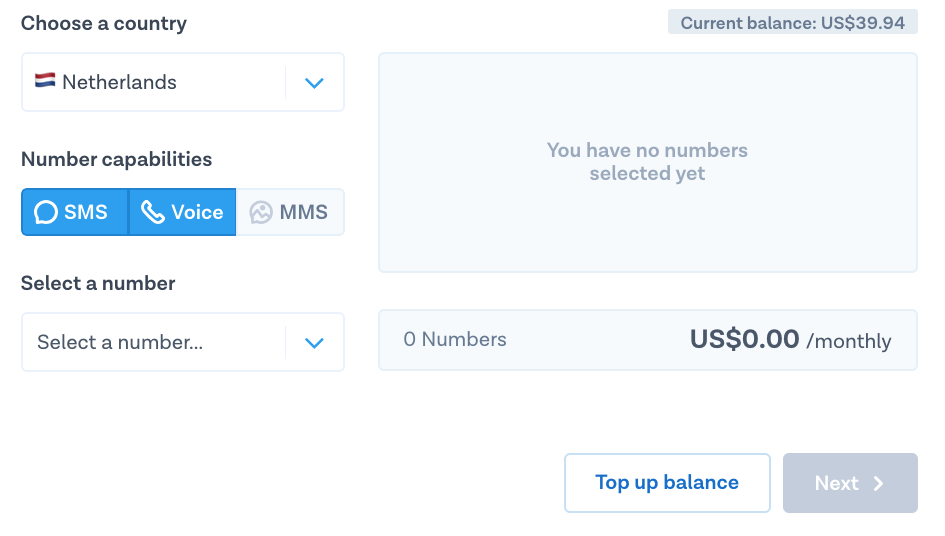
Go to the ‘Numbers’ section in the left-hand side of your Dashboard and click the blue button ‘Buy a number’ in the top-right side of your screen.
Pick the country in which you and your customers are located, and make sure both the SMS and Voice capabilities are selected.
Choose one number from the selection and the duration for which you want to pay now.
Confirm by clicking ‘Buy Number’ in the bottom-right of your screen.
Awesome, you’ve set up your first virtual mobile number! 🎉
One is enough for testing, but for real usage of the masked number system, you'll need a larger pool of numbers; simply follow the same steps listed to purchase more.
Pro-tip: Check out our Help Center for more information about virtual mobile numbers and country restrictions.
Connect the number to a webhook for SMS
So you have a number now, but MessageBird has no idea what to do with it. That's why now you need to define a Flow that links your number to your webhook. We’ll start with the flow for inbound SMS messages:
STEP ONE
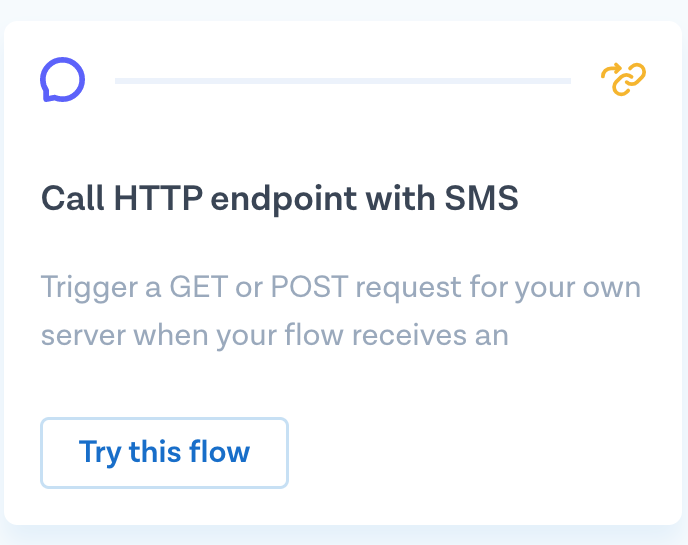
Go to Flow Builder, choose the template ‘Call HTTP endpoint with SMS’, and click ‘Try this flow’.
STEP TWO
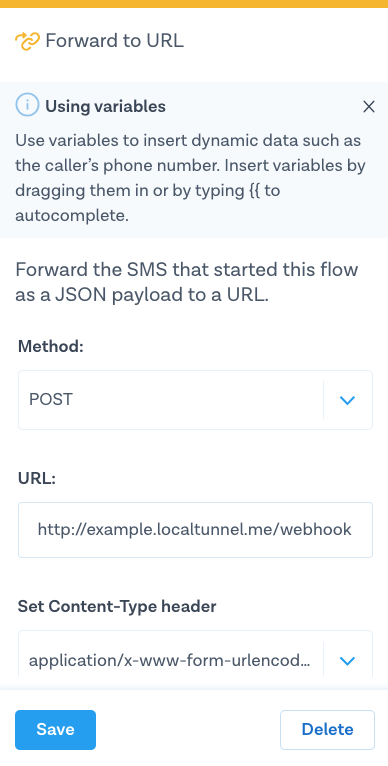
This template has two steps. Click on the first step ‘SMS’ and select the number or numbers you’d like to attach the flow to. Now, click on the second step ‘Forward to URL’ and choose POST as the method; copy the output from your localtunnel.me URL into the URL field—this is the name of the route we will use to handle incoming messages. Click Save.
STEP THREE
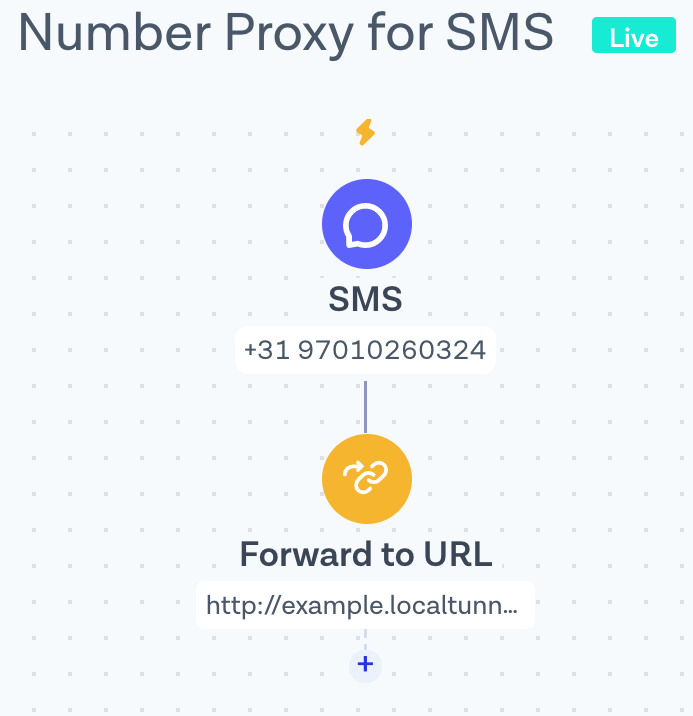
Ready! Hit ‘Publish’ on the right top of the screen to activate your flow. Well done, another step closer to testing incoming messages! Your flow should look something like this:
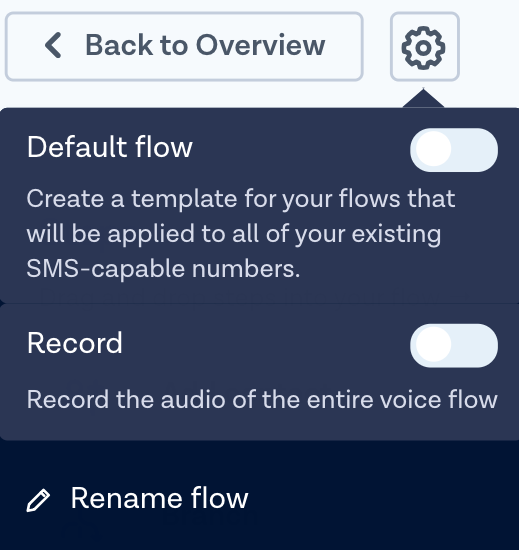
Pro-tip: It might be useful to rename it this flow, because Untitled flow won't be helpful in the long run. You can do this by clicking on the icon next to button ‘Back to Overview’ and pressing ‘Rename flow’.
Connect the number to a webhook for voice
Let’s set up a second flow for incoming voice calls:
STEP ONE
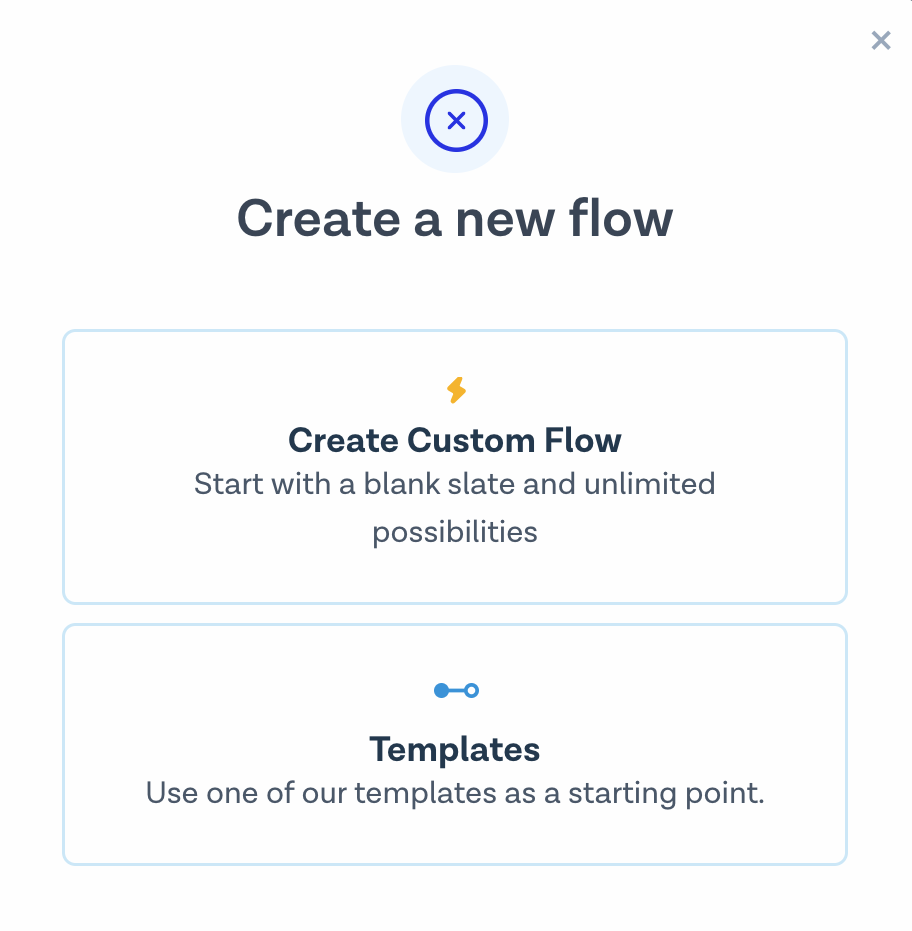
Go back to Flow Builder and hit the button ‘Create new flow’ and then ‘Create Custom Flow’.
STEP TWO
Give your flow a name, choose ‘Phone Call’ as the trigger and hit ‘Next’.

STEP THREE
Click on the first step ‘Phone Call’ and select the number or numbers you’d like to attach the flow to.
STEP FOUR
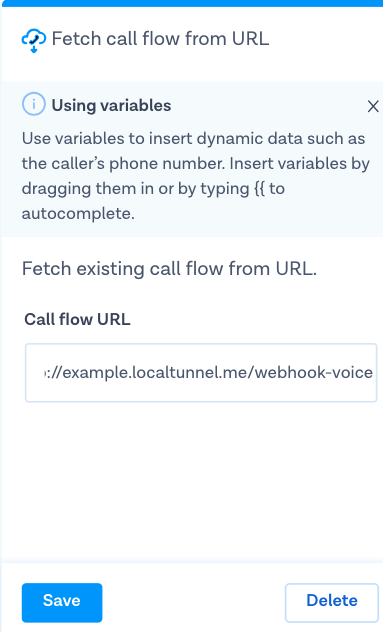
Add a new step by pressing the small ‘+’, choose ‘Fetch call flow from URL’ and paste the same localtunnel base URL into the form, but this time append /webhook-voice to it—this is the name of the route we use to handle incoming calls in our sample application. Click on ‘Save’ when ready.
STEP FIVE
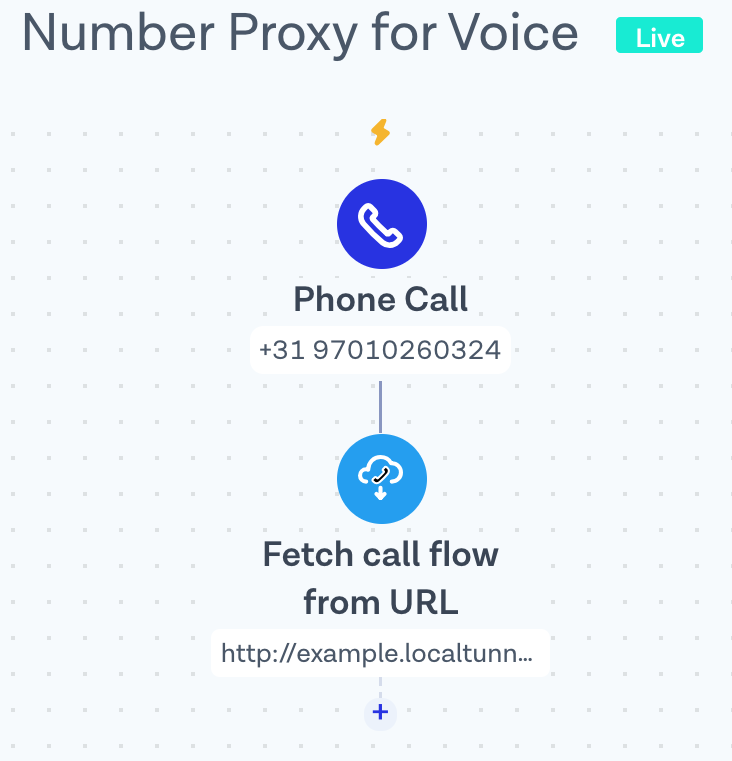
Ready! Hit ‘Publish’ on the right top of the screen to activate your flow. Your flow should look something like this:
You're done setting up flows for your application! Now, we can begin writing routes in your application for the /webhook and /webhook-voice URL paths that these flows are using.
Web application
Now we can start writing the web server component of your application. We won't go through how to write Go HTML templates or the basics of HTTP routing; instead, we'll be focusing on routing logic.
First, let's review what we need our web server to do:
- Provide a administrative interface for managing BirdCar rides. On this administrative interface, we should be able to: Browse all known customers, drivers, and proxy numbers. Create new rides.
- Listen on our webhook URLs for the following: Listens for POST requests on /webhook to handle any SMS messages forwarded to the web server from our VMNs by the MessageBird API. Listens for GET requests on /webhook-voice to handle any voice calls forwarded to the web server from our VMNs by the MessageBird API.
Our web server code can be found in the following locations in the sample code repository:
- views/: This contains all our Go HTML templates. default.gohtml contains the code for our base layout, while landing.gohtml contains the code for our landing page template. When rendered, landing.gohtml uses the Go HTML templating syntax to pull data from the struct (of type RideSharingDB) that we pass when executing the template.
- routes.go: Contains our route handlers. Here, we'll be writing code that handles the POST and GET requests that our web server receives, as well as send MessageBird SMS messages and make voice calls when needed.
- routeHelpers.go: Contains code for helpers that we use in routes.go.
- main.go: We'll need to add code here that initializes our database, defines our routes, and starts the web server.
In this section, we'll cover the following topics:
- Stubbing out routes
- Writing a template rendering helper
- Building an admin interface
- Writing a proxy number availability helper
- Writing a helper to send SMS messages
- Writing our message webhook handler
- Writing our voice call webhook handler
Stubbing out routes
First, we'll stub out our routes in main.go. Rewrite your main() block in main.go to look like the following:
// main.go// Remember to add the `net/http` package to your import statement.func main() {dbdata := new(RideSharingDB)initExampleDB()mb := messagebird.New(os.Getenv("MESSAGEBIRD_API_KEY"))mux := http.NewServeMux()mux.Handle("/", landing(dbdata))mux.Handle("/createride", createRideHandler(dbdata, mb))mux.Handle("/webhook", messageHookHandler(dbdata, mb))mux.Handle("/webhook-voice", voiceHookHandler(dbdata, mb))port := ":8080"log.Println("Serving on", port)err := http.ListenAndServe(port, mux)if err != nil {log.Fatal(err)}}
Here, we've:
- Initialized a dbdata struct that uses our RideSharingDB type. We'll be passing this to our handlers to update and display in rendered views.
- We've also initialized our MessageBird Go client, and saved it as mb. We'll also pass this to our handlers to make requests to the MessageBird API.
- Then, we stub out four routes: /: This is our default route, and will be handled by landing(). /createride: This is the route for creating new rides, and will be handled by createRideHandler(). /webhook: This is the route on which we'll be listening for POST requests from the MessageBird server when one of our VMNs receives an SMS message, and will be handled by messageHookHandler(). /webhook-voice: This is the route on which we'll be listening for GET requests from the MessageBird server when one of our VMNs receives a call, and will be handled by voiceHookHandler().
- With all that done, we then initialize our web server with by calling http.ListenAndServe().
Writing a template rendering helper
The code that loads and executes our templates to render a view can be offloaded to a helper, that we'll write in our routeHelpers.go file.
In there, we've written our renderDefaultTemplate() helper:
// routeHelpers.go// ...func renderDefaultTemplate(w http.ResponseWriter, thisView string, data interface{}) {renderthis := []string{thisView, "views/layouts/default.gohtml"}t, err := template.ParseFiles(renderthis...)if err != nil {log.Fatal(err)}err = t.ExecuteTemplate(w, "default", data)if err != nil {log.Fatal(err)}}
Using this, we can render a view in a http.HandlerFunc() by writing renderDefaultTemplate(w, <template-file-to-render>, <data-to-display>). For example, for our landing() handler, we write:
func landing(dbdata *RideSharingDB) http.HandlerFunc {return func(w http.ResponseWriter, r *http.Request) {// ...renderDefaultTemplate(w, "views/landing.gohtml", dbdata)}}
Writing our renderDefaultTemplate() helper this way also means that we can use the same line of code to update the page whenever whenever our ridesharing database is updated:
// Examplefunc updateExample(dbdata *RideSharingDB) http.HandlerFunc {return func(w http.ResponseWriter, r *http.Request) {db, _ := dbdata.loadDB()if r.Method == "POST" {// Get a message from POST data.r.ParseForm()// Copies message to our dbdata struct Message field.message := r.FormValue("text_from_POST_submission")dbdata.Message = message// Render view, with updated dbdata struct.renderDefaultTemplate(w, "views/landing.gohtml", dbdata)// Must return, or handler will instruct our application to// continue running subsequent code.return}renderDefaultTemplate(w, "views/landing.gohtml", dbdata)}}
Building an admin interface
Next, we'll create the administrator's interface for our web application. To keep things brief, we won't cover the sample code in that much detail. To check the full code sample, go to the MessageBird Developer Tutorials GitHub repository.
Our landing.gohtml needs to render the following fields from our dbdata *RideSharingDB struct for our admin interface:
- dbdata.Customers: Our list of known customers is displayed as a dropdown menu from which an administrator can select a customer when creating a new ride.
- dbdata.Drivers: Our list of known drivers is displayed as a dropdown menu from which an administrator can select a drivers when creating a new ride.
- dbdata.ProxyNumbers: Our list of VMNs in our proxy number pool is displayed as a table. Our ridesharing service should randomly assign an available proxy number when a new ride is created.
- dbdata.Rides: Our list of rides is displayed as a table.
- dbdata.Messages: This should contain any messages, usually error messages, that we want to display on our rendered view. By default, this should be set to an empty string value ("").
Our "/" route, which renders our admin interface, should do only two things:
1. Load our ridesharing database. 2. Execute and render our templates, having passed in data we've loaded from our database. Our renderDefaultTemplate() helper helps us with this.
Other route handlers that display a page follow a similar execution path. For example, our /createride route does the following:
1. Load our ridesharing database. 2. Collects data submitted through a POST request. 3. Updates our ridesharing database. 4. Re-loads our ridesharing database. 5. Notifies the customer and driver that they've been assigned a new ride and VMN. 6. Executes and renders our templates, having passed in updated data we've loaded from our database.
In the process above,º only steps 2, 3, and 5 require new code.
For more details on how we do this for the rest of the routes and handlers, simply see the sample code in the MessageBird Developer Tutorials GitHub repository.
Writing a proxy number availability helper
In our routes.go file, the handler for our /createride route creates a new ride by reading submitted form data that contains a customer ID and driver ID, and from that compiles the information we need for the new ride. Part of the information set that we need to create a ride is the VMN we should assign to the ride.
The VMN assigned to the ride acts as a proxy number, which the customer or driver for that ride can call to contact the other party instead of contacting that party directly. We need to write a function that decides which VMN is available for assignment, and returns it for use by our application.
In some proxy number systems, a unique VMN is assigned per user, or per transaction. We want to be a bit more economical than that, and instead use a proxy number system that assigns a unique VMN per set of customers and drivers.
To illustrate, let's say we have customers A and B, and drivers C and D:
- A ride assigned to customer A and driver C will use VMN_1.
- A ride assigned to customer A and driver D will use VMN_2.
- A ride assigned to customer B and driver C will use VMN_3.
- But for a ride assigned to customer B and driver D, we can reuse VMN_1 because it hasn’t been previously associated with either customer B or driver D.
By using this system, we can:
- Rotate VMNs, instead of having to keep a large pool of VMNs for unique assignments.
- Identify rides with a combination of a customer's phone number and the VMN used, or a driver's phone number and the VMN used. We'll use this to our advantage when writing our /webhook and /webhook-voice route handlers.
To write our helper function, we'll start out with defining our function's inputs. We know that we'll use this function in a handler, where we'll be getting the ID of one customer and one driver, so we'll write our helper function to take our database struct (dbdata *RideSharingDB), a customer ID (customerID int), and a driver ID (driverID int), and returns a proxy number (of ProxyNumberType type) or an error. Add the following code to the bottom of your routeHelpers.go file:
// routeHelpers.go// ...func getAvailableProxyNumber(dbdata *RideSharingDB, customerID int, driverID int) (ProxyNumberType, error) {return ProxyNumberType{}, nil}
We also know that we can assign any VMN to the next ride if it’s the first ride in the database. Modify getAvailableProxyNumber() to look like the following:
// routeHelpers.go// ...func getAvailableProxyNumber(dbdata *RideSharingDB, customerID int, driverID int) (ProxyNumberType, error) {// If no rides, then return a random Proxy Number.if len(dbdata.Rides) == 0 {// Because Go doesn't read maps in sequence, we can use a for loop to select a random numberfor _, v := range dbdata.ProxyNumbers {return v, nil}// If we're here, then we've failed to get a proxy number; return errorreturn (ProxyNumberType{}), fmt.Errorf("no available proxy numbers")}// If we're here, then we've failed to get a proxy number; return errorreturn (ProxyNumberType{}), fmt.Errorf("no available proxy numbers")}
Next, we know that we want to identify rides by a combination of the customer's phone number, driver's phone number, and the VMN for that ride. Remember that extra struct field that we defined in our RideType struct, NumGrp? If we go back to the Load Data into Data Structures section, we'll see close to the bottom of our loadDB() block that we have these lines of code:
// db.gofunc (dbdata *RideSharingDB) loadDB() error {// ...thisRide.NumGrp = append(thisRide.NumGrp, []int{thisRide.ThisCustomer.ID, thisRide.ThisProxyNumber.ID})thisRide.NumGrp = append(thisRide.NumGrp, []int{thisRide.ThisDriver.ID, thisRide.ThisProxyNumber.ID})// ...}
This means that for every ride, we're populating its NumGrp field with a list of []ints that tells us which combinations of customer IDs, driver IDs, and proxy number IDs that ride contains. This allows us to quickly check if a ride contains a given combination with the following containsNumGrp() function:
// routeHelpers.gofunc getAvailableProxyNumber(/*...*/) (/*...*/){// ...// Checks if []int contains an intcontainsNumGrp := func(arr [][]int, findme []int) bool {for _, v := range arr {if reflect.DeepEqual(v, findme) {return true}}return false}// ...}// ...
Next, we create a flat list of the contents of all the NumGrp fields in our database, so that it’s easily accessible via a rideProxySets variable:
// routeHelpers.gofunc getAvailableProxyNumber(/*...*/) (/*...*/){// ...var rideProxySets [][]intfor _, v1 := range dbdata.Rides {for _, v := range v1.NumGrp {rideProxySets = append(rideProxySets, v)}}// ...}
Once that’s done, we're finally ready to perform the actual check. At the bottom of our getAvailableProxyNumber() block, add the following lines of code just before the final return statement:
// routeHelpers.gofunc getAvailableProxyNumber(/*...*/) (/*...*/){//...for _, v2 := range dbdata.ProxyNumbers {// Check if both customer/driver+proxy number sets do not exist in current proxy setsif !containsNumGrp(rideProxySets, []int{customerID, v2.ID}) && !containsNumGrp(rideProxySets, []int{driverID, v2.ID}) {return v2, nil}}// If we end up here, then we've failed to get a proxy numberreturn (ProxyNumberType{}), fmt.Errorf("no available proxy numbers")}// ...
The final block of code should look like this:
// routeHelpers.gofunc getAvailableProxyNumber(dbdata *RideSharingDB, customerID int, driverID int) (ProxyNumberType, error) {if len(dbdata.Rides) == 0 {for _, v := range dbdata.ProxyNumbers {return v, nil}return (ProxyNumberType{}), fmt.Errorf("no available proxy numbers")}containsNumGrp := func(arr [][]int, findme []int) bool {for _, v := range arr {if reflect.DeepEqual(v, findme) {return true}}return false}var rideProxySets [][]intfor _, v1 := range dbdata.Rides {for _, v := range v1.NumGrp {rideProxySets = append(rideProxySets, v)}}for _, v2 := range dbdata.ProxyNumbers {if !containsNumGrp(rideProxySets, []int{customerID, v2.ID}) && !containsNumGrp(rideProxySets, []int{driverID, v2.ID}) {return}}return (ProxyNumberType{}), fmt.Errorf("no available proxy numbers")}
In our routes.go file, we call the getAvailableProxyNumber() helper like this:
// routes.go// ...availableProxy, err := getAvailableProxyNumber(dbdata, customerIDint, driverIDint)if err != nil {dbdata.Message = fmt.Sprintf("We encountered an error: %v", err)log.Println(err)renderDefaultTemplate(w, "views/landing.gohtml", dbdata)return}// ...
Writing a helper to send SMS messages
We'll also want to write a helper for sending SMS messages using the MessageBird API, so that we can encapsulate the error handling inside a function call. At the bottom of routeHelpers.go, add the following lines of code:
// routeHelpers.go// mbError handles MessageBird REST API errorsfunc mbError(err error) {if err != nil {switch errResp := err.(type) {case messagebird.ErrorResponse:for _, mbError := range errResp.Errors {log.Printf("Error: %#v\n", mbError)}}return}}// mbSender sends SMS messagesfunc mbSender(mb *messagebird.Client, originator string, recipient []string, msgbody string, params *sms.Params) {msg, err := sms.Create(mb,originator,recipient,msgbody,params,)if err != nil {mbError(err)log.Printf("Could not send sms notification to %s", recipient)} else {log.Print(msg)}}
Once you've done this, you can call the mbSender() function to send SMS messages to a destination number, like what we've done with createRideHandler() in routes.go:
func createRideHandler(/*...*/) http.HandlerFunc {// ...// Notify this customermbSender(mb,availableProxy.Number,[]string{dbdata.Customers[customerIDint].Number},fmt.Sprintf("%s will pick you up at %s. Reply to this message to contact the driver.", dbdata.Drivers[driverIDint].Name, dateTime),nil,)// Notify this drivermbSender(mb,availableProxy.Number,[]string{dbdata.Drivers[driverIDint].Number},fmt.Sprintf("%s will pick you up at %s. Reply to this message to contact the driver.", dbdata.Customers[customerIDint].Name, dateTime),nil,)// ...}
Writing our message webhook handler
Now, we'll write the handler that handles the POST requests we'll be getting from the MessageBird server when our VMNs receive an SMS message.
Our webhook handler needs to do the following:
1. Load our ridesharing database. 2. Check if we're receiving a POST request. *3. If we're receiving a POST request, parse the form data submitted. When the MessageBird servers receives and forwards an SMS message to a defined webhook URL, our web application receives it as a map similar to the following:
map[message_id:[7a76afeaef3743d28d0e2d9362xxxxxx] originator:[1613209xxxx] reference:[4774934xxxx] createdDatetime:[2018-09-24T08:30:59+00:00] id:[f91908b75f9e4b1fba3b96dc4499xxxx] message:[this is a test message] receiver:[1470800xxxx] body:[this is a test message] date:[1537806659] payload:[this is a test message] sender:[1613209xxxx] date_utc:[1537777859] recipient:[1470800xxxx]]
4. We check the parsed form data for an "originator" (sender of the message), a "receiver" (the VMN that received the message), and a "payload" (the body of the sent SMS message). 5. We figure out if the "originator" is a customer or driver. To do this, we'll add two helper functions to routeHelpers.go and call them in our handler:
func checkIfCustomer(dbdata *RideSharingDB, checkme string) bool {for _, v := range dbdata.Customers {if v.Number == checkme {return true}}return false}func checkIfDriver(dbdata *RideSharingDB, checkme string) bool {for _, v := range dbdata.Drivers {if v.Number == checkme {return true}}return false}
*6. If the "originator" is a customer, then we call sms.Create() to send the "payload" to the driver for that ride. If the "originator" is a driver, then we send the "payload" to the customer.
The handler you'll end up writing should look like this:
func messageHookHandler(dbdata *RideSharingDB, mb *messagebird.Client) http.HandlerFunc {return func(w http.ResponseWriter, r *http.Request) {err := dbdata.loadDB()if err != nil {w.WriteHeader(http.StatusInternalServerError)fmt.Fprintf(w, "Server encountered an error: %v", err)return}if r.Method == "POST" {// Read response from MessageBird REST API serversr.ParseForm()originator := r.FormValue("originator")receiver := r.FormValue("receiver")payload := r.FormValue("payload")// Check rides for proxy number used// Proxy number should be unique in list of ridesfor _, v := range dbdata.Rides {if v.ThisProxyNumber.Number == receiver {switch {case checkIfCustomer(dbdata, originator):// forward message to drivermbSender(mb,receiver,[]string{v.ThisDriver.Number},payload,nil,)returncase checkIfDriver(dbdata, originator):// forward message to customermbSender(mb,receiver,[]string{v.ThisCustomer.Number},payload,nil,)returndefault:log.Printf("Could not find ride for customer/driver %s that uses proxy %s", originator, receiver)}} else {log.Printf("Unknown proxy number: %s", receiver)}}// Return any response, MessageBird won't parse thisfmt.Fprint(w, "OK")return}}}
Writing our voice call webhook handler
When the MessageBird servers receive a voice call on a VMN for which we've set up a MessageBird voice flow for earlier, it makes a GET request on the URL we've defined for that flow. When it makes that request, it expects an XML response that defines a call flow. That call flow contains instructions for MessageBird to make a voice call. If you want to check out more information on how to write XML call flows, you can go to the MessageBird API Reference
The handler that we're writing for the /webhook-voice route needs to parse that GET request and respond with the correct XML call flow.
Our handler should do the following:
1. Load our ridesharing database. 2. Set our "Content-Type" HTTP header to application/xml. *3. Parse the GET request with r.ParseForm(). When the MessageBird servers receives and forwards a voice call to a defined webhook URL, our web application receives it as a map similar to the following:
map[callID:[2894efe1-63b7-4d37-b006-3aab7fxxxxxx] destination:[1470800xxxx] numberID:[272cca7c-c2d6-4781-9e92-168ba0xxxxxx] source:[1613209xxxx] variables:[{}]]
4. Using the "destination" (the VMN that received the voice call) and the "source" (the caller), we check if the "source" is a customer or driver. 5. If the "source" is a customer, we respond with an XML call flow that transfers the call to the driver for that ride, and vice-versa. To do this, we write a response to the http.ResponseWriter with the following lines of code:
// where we've saved the number to call as 'forwardToThisNumber'fmt.Fprintf(w, "<?xml version='1.0' encoding='UTF-8'?><Transfer destination='%s' make='true' />", forwardToThisNumber)return
*6. If we cannot find the ride or any target party to transfer the call to, we respond with an XML call flow that tells the caller that the call transfer has failed.
We should end up with a voiceHookHandler() that looks like this:
// routes.gofunc voiceHookHandler(dbdata *RideSharingDB, mb *messagebird.Client) http.HandlerFunc {return func(w http.ResponseWriter, r *http.Request) {// XML-only responsew.Header().Set("Content-Type", "application/xml")err := dbdata.loadDB()if err != nil {w.WriteHeader(http.StatusInternalServerError)fmt.Fprintf(w, "Server encountered an error: %v", err)return}r.ParseForm()proxyNumber := r.FormValue("destination")caller := r.FormValue("source")var forwardToThisNumber stringtransactionFailXML := fmt.Sprint("<?xml version='1.0' encoding='UTF-8'?>" +"<Say language='en-GB' voice='female'>Sorry, we cannot identify your transaction. " +"Please make sure you have call in from the number you registered.</Say><Hangup />")for _, v := range dbdata.Rides {if v.ThisProxyNumber.Number == proxyNumber {switch {case checkIfCustomer(dbdata, caller):// Forward call to driverforwardToThisNumber = v.ThisDriver.Numbercase checkIfDriver(dbdata, caller):// Forward call to customerforwardToThisNumber = v.ThisCustomer.Numberdefault:// Speaks transaction fail message and returnsfmt.Fprint(w, transactionFailXML)log.Printf("Transfer to %s failed.", forwardToThisNumber)return}} else {// Speaks transaction fail message and returnsfmt.Fprint(w, transactionFailXML)log.Printf("Transfer to %s failed.", forwardToThisNumber)return}}// If we get to this point, assume all is in order and attempt to transfer the calllog.Println("Transferring call to ", forwardToThisNumber)fmt.Fprintf(w, "<?xml version='1.0' encoding='UTF-8'?><Transfer destination='%s' make='true' />", forwardToThisNumber)return}}
Testing
You’re done! It’s time to test your application. Before doing so, double-check if:
- You've set up at least one VMN.
- Your VMNs should have two flows—the first waits for SMS messages and forwards them as a POST request to our application; the second waits for voice calls, and when it receives one requests a call flow from our application.
- Your localtunnel.me tunnel is still running. Remember that whenever you start a fresh tunnel, you'll get a new URL, so you have to update the flows accordingly. You can also configure a more permanent URL using the -s attribute with the lt command.
Are you ready? Awesome! To start your ridesharing application, open a new terminal session and run the following command:
go run *.go
Go to http://localhost:8080 and select a customer, a driver, and create a ride. If everything is working, the phone numbers for the selected customer and driver should receive an SMS notification.
If you send an SMS message from the customer's phone number to the VMN, that SMS message should be automatically forwarded to the driver's phone, and vice-versa. Similarly, using the customer's phone to call the assigned VMN would automatically forward that call to the driver's phone, and vice-versa.
Awesome! You can now use the flow, code snippets, and UI examples from this tutorial as an inspiration to build your own application. Don't forget to download the code from the MessageBird Developer Tutorials GitHub repository.
Nice work! 🎉
You've just built your own number masking system with MessageBird using Go!
Start building!
Want to build something similar but not quite sure how to get started? Please feel free to let us know at support@messagebird.com; we'd love to help!